Example of a Memo Report


Contents
Writing Exercises
Writing Courses


This web page presents an example of a memo report [Herwald, 1999]. Note that different memo formats may have different expectations as far as the layout and typography. Also note that in this report, carets (>) are given to reveal the line spacings in the report's format (in an actual report, these carets would not appear). Moreover, in this report, the actual appendices are not given--in the actual report, these appendices would be present, and each would begin on a separate page. Finally, use 12-point type for the headings, subheadings, and text; use 10-point type for the figure captions.

For proper viewing of these pages, use Netscape.


Electrical and Computer Engineering
Virginia Tech
January 29, 1999

>
>
To:

From:

Subject:

Dr. Karen Thole

Marc Herwald MH

Design of a Temperature Measurement and Display System Using the 68HC11

>
>
This semester, our design team is creating a design using the Motorolla 68HC11 microcontroller, referred to here as the HC11. Before beginning this design project, we are to perform a series of preliminary designs and tests on this microcontroller. This laboratory report presents one of these preliminary designs: the design of a temperature measurements and display system.
>
>
Background on the HC11 Microcontroller
>
The preliminary design presented in this laboratory report makes use of the HC11 analog-to-digital (A/D) converter and the serial subsystems. These components are shown in Figure 1. The hardware added for the preliminary design includes a temperature measurement circuit connected to one of the HC11 A/D input pins on Port E, and light emitting diodes (LEDs) connected to each pin of Port B. These LEDs act as temperature indicators. Additionally, the design includes a connection between the HC11 and a remote personal computer (PC) using an RS-232 connection. An assembly software program developed for this design performs various functions for using the added hardware.

This report breaks down the preliminary design into two sections. In the first section, separate hardware and software designs are presented. The hardware designed for section one includes the temperature measurement circuit and the connection of LEDs to Port B. The software designed for section one initializes the A/D converter and serial subsystems, controls the measurement and storage of the temperature in a RAM variable called TEMP, and controls the display of temperature on the LED outputs.

In the second section of the report, the HC11 is connected to a remote PC terminal using an RS-232 connection. After adding the software required to initialize the serial subsystem, subroutines, which are added to the software program developed for the report's first section, allow the HC11 to send a message to the PC if the measured temperature falls below 20 degrees or above 90 degrees.

Figure 1. Temperature measurement and display system developed for the Motorolla 68HC11 microcontroller, which is attached to a universal evaluation board (EVBU).
>
>
Description of Testing and Design
>
This section presents a description of the testing and design for this first preliminary design. This description is broken into sections: (1) connecting a temperature meausrement circuit to the HC11 microcontroller; and (2) adding a serial output to the HC11 microcontroller.
>
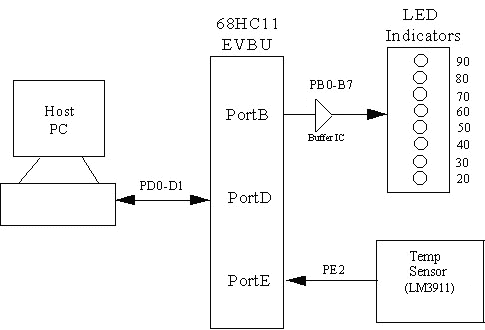
Connecting a Temperature Measurement Circuit to the HC11. Connecting a temperature measurement circuit to the HC11 microcontroller involved both hardware and software. Hardware was added to control the measurement and display of the temperature. This hardware includes a temperature measurement circuit and LEDs attached to Port B (the temperature measurement circuit is shown in Figure A-1 in Appendix A). The circuit was designed according to the specifications obtained from the Computer Engineering Laboratories website for ECPE 4535 [Lineberry, 1998]. Within the circuit is an LM3911 temperature controller integrated circuit (IC), the output of which is connected into a non-inverting opamp. The output of the opamp connects to the HC11 A/D input pin E2 through a 1000-ohm resistor. The circuitry is scaled so that 0 volts out means 0 degrees and 5 volts out means 110 degrees.

To each of the output pins of Port B, LEDs are connected using a 74HC244 buffer IC and 330-ohm current limiting resistors as shown in Appendix A. The LEDs are located in the breadboard area of the trainer kits.

To control this added hardware, the HC11 was programmed following the pseudo code, flow chart, and program listing given in Appendices B, C, and D, respectively. The program shown in Appendix D consists of three subroutines that are called from MAIN. The three subroutines are named STARTUP, GETTEMP, and SETDISP.

The STARTUP subroutine is used to enable the A/D converter subsystem, which is connected to Port E. First the A/D is powered up by setting bit 7 of the OPTION register. After a 100 microsecond delay, the control word $22 is written to the ADCTL register to start continuous, single-scan conversions on Port E pin E2.

The subroutine GETTEMP is used to input and scale the analog voltage from the temperature sensor circuit. The register ADR3 holds the result of the A/D conversions and is loaded into accumulator A and then multiplied by a scale factor contained in accumulator B by using the MUL instruction. The result contained in accumulator A is then right shifted once giving the temperature in degrees Fahrenheit, which is then stored in the RAM variable TEMP. The equation for finding TEMP is shown in (1).

TEMP = ADR3 ( Scale Factor >> 1) (1)

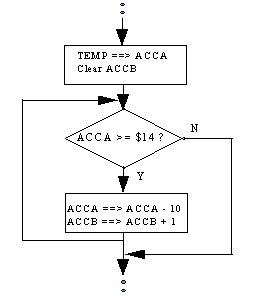
The subroutine SETDISP controls the lighting of the LEDs connected to Port B based on the present value of TEMP. First, TEMP is loaded into accumulator A and compared with the value 20, the designated cut-off for low temperature. Accumulator B is cleared to zero and represents the initial count value for the number of LEDs to turn on. If the value in accumulator A is greater than or equal to 20, then the count in accumulator B is incremented and 10 is subtracted from accumulator A. The process then repeats as long as the value in accumulator A is greater than or equal to 20. This process is shown in flowchart form in Figure 2 and in Appendix C. After the number of LEDs to turn on have been determined as shown in Figure 2, the number of bits indicated by the count value in accumulator B are set high on Port B beginning with bit 0.

Figure 2. Flowchart illustrating the determination of the number of Port B bits to enable for the LED display.
>
Adding Serial Output to the HC11. This section presents the addition of three subroutines to the existing software developed in the previous section. The added subroutines, listed in Appendix D, are called OUTSCI, MESSOUT, and TEMPCHK. In addition to adding these three subroutines, the subroutine STARTUP, used in the previous section, was modified to initialize the serial subsystem of the HC11 so that it can communicate with the host PC at 9600 baud. This modification was done by writing control words to the BAUD, SCCR1, and SCCR2 control registers in the HC11 as shown in Appendix D.

After modifying the STARTUP subroutine, the OUTSCI subroutine was added to write data bytes from the HC11 to the remote PC terminal. The data byte to be sent is contained in accumulator A. The subroutine checks that the TDRE bit is set in the SCSR register, and if it is, the data byte in accumulator A is written to the SCDR register. If the TDRE bit is not set, the program continually reads the SCSR register until bit TDRE is set before writing accumulator A to the SCDR register.

The subroutine MESSOUT utilizes the OUTSCI subroutine to write character strings to the remote PC terminal. Before calling MESSOUT, the X index register is set to point to the beginning of the character string to be sent. The MESSOUT subroutine then sends out the string by calling OUTSCI for each character until the NULL character is reached, which marks the end of a string.

Lastly, the subroutine TEMPCHK was added to the existing software program to check the temperature range. The subroutine TEMPCHK calls MESSOUT to print the message "Temperature is very low.\n" if TEMP is less than 20 degrees Fahrenheit. If TEMP is greater that 90 degrees Fahrenheit, TEMPCHK calls MESSOUT to print the message "Temperature is very high.\n" A flag variable called FLG ensures that the messages are not repeatedly sent for each entry into the very hot or very cold temperature regions. FLG is set to zero if TEMP is between 20 and 90 degrees and to one otherwise.

>
>
Discussion
>
While performing the preliminary design presented in this report, several mistakes and difficulties were encountered. The initial setup of the serial subsystem of the 68HC11 involved some troubleshooting. We also had problems with sending the alarm messages more than one time because a flag variable was not set. The diagnosis and solutions to these problems are discussed in this section.

Initially, the serial writes from the 68HC11 to the host PC did not work properly because the SP was not initialized and the data string was not terminated properly. With an incorrect SP, the function calls to the OUTSCI subroutine did not work as expected, and in fact caused the program to crash. By correctly loading the SP, the OUTSCI subroutine worked as expected. We also had a problem sending out messages using MESSOUT because we did not terminate the message strings correctly with the NULL zero. By adding the NULL zero to the end of the strings, the sending of messages worked as expected.

A final problem was the output rate of the alarm messages. At first, we did not set a flag to indicate to the program that a message had already been sent to the PC. This failure caused messages to be continually sent to the PC terminal when the temperature was outside of the normal operating region. This problem was fixed by making a variable called FLG that was set as soon as the alarm message was sent and then cleared when the temperature returned to the normal operating region.
>
>
Conclusion
>
This preliminary design report has discussed the development of a temperature measurement and display system. Temperature measurement and display circuits were built and control software was written to use the added hardware. By keeping track of the measured temperature, the HC11 was able to control an LED temperature scale. Also, if the temperature became very cold or hot, an alarm message was sent to a host PC terminal.

This lab has introduced us to the important topics of A/D conversion and serial communications. The use of the A/D converter has allowed access to analog inputs from within the computer. Besides temperature measurement, the use of an A/D converter has many potential applications in automatic control systems and factory automation. For example, in an electric motor drive, the phase currents and flux are continually measured by using scaling circuitry and an A/D converter input to a microprocessor or DSP. We also expect to use serial communications in our final project to send data to a host PC monitor program that can modify and display important variables in the 68HC11. The systems studied for this lab truly have many potential applications.
>
>
References
>
Lineberry, Bob, "Computer Engineering Laboratories Website at Virginia Tech," http://www.ee.vt.edu/cel (Blacksburg, VA: ECE Department, 1998).
>
Spasov, Peter, Microcontroller Technology: The 68HC11, 2nd ed. (Englewood Cliffs, NJ: Prentice Hall, 1996).


Attachments:
Appendix A: Hardware Schematic
Appendix B: Pseudo Code for the Software Developed
Appendix C: Program Flow Chart
Appendix D: Program Listing


Copies to:
Michelle Korbut
Patrick Thomas


>
>
>
Appendix A: Hardware Schematic
>
>

Figure A-1. Hardware schematic for the temperature measurement circuit designed for this lab. In an actual report, all the connections, pin numbers, and pin labels should be shown.


>
>
>
Appendix B: Pseudo Code for the Software Developed
>
>
XXXXXXXXXXXXXXXXXX*
XXXXXXXXXX
XXXXXXXXX
XXXXXXXXXXXXXXXXXXXXXX
XXXXXXXXXXXXXX
XXXXXXXXXXXX
XXXXXXXXXXXXXXXXXX
XXXXXXXXXX
XXXXXXXXX
XXXXXXXXXXXXXXXXXXXXXX
XXXXXXXXXXXXXX
XXXXXXXXXXXX

*In an actual report, the pseudo code would appear here.


>
>
>
Appendix C: Program Flow Chart
>
>

Figure C-1. Flow chart for the lab program. In an actual report, you would fill in the blocks.


>
>
>
Appendix D: Program Listing
>
>
**************
Program Header
**************

**************
include statements
**************

**************
Equate Statements
**************

**************
RAM var defs
***************
.
.
.
.
.
.

ORG $B600
LDS #$1FF
JSR STARTUP ;Initialize A/D and SCI, init RAM vars
MAIN JSR GETTEMP ;Set RAM var TEMP to current temperature
JSR SETDISP ;Update LED display
JSR TEMPCHK ;Check to see if hot or cold message should be sent
BRA MAIN ;Repeat

.
.
.
.
.
.
***************
Subroutine Listings
***************

***************
Interrupt Service Routines
***************


Last updated 1/00
http://www.me.vt.edu/writing/
http://ae3.cen.uiuc.edu/writing/
All materials at this web site are the intellectual property of the editors and authors. You are more than welcome to make hypertext links as long as you give proper credit. If you have comments, suggestions, or questions, please direct them to one of the editors.